Activities
What is Activity ?
An activity represents a single screen in your app with an interface the user can interact with. For example, an email app might have one activity that shows a list of new emails, another activity to compose an email, and another activity for reading individual messages. Your app is probably a collection of activities that you create yourself, or that you reuse from other apps.
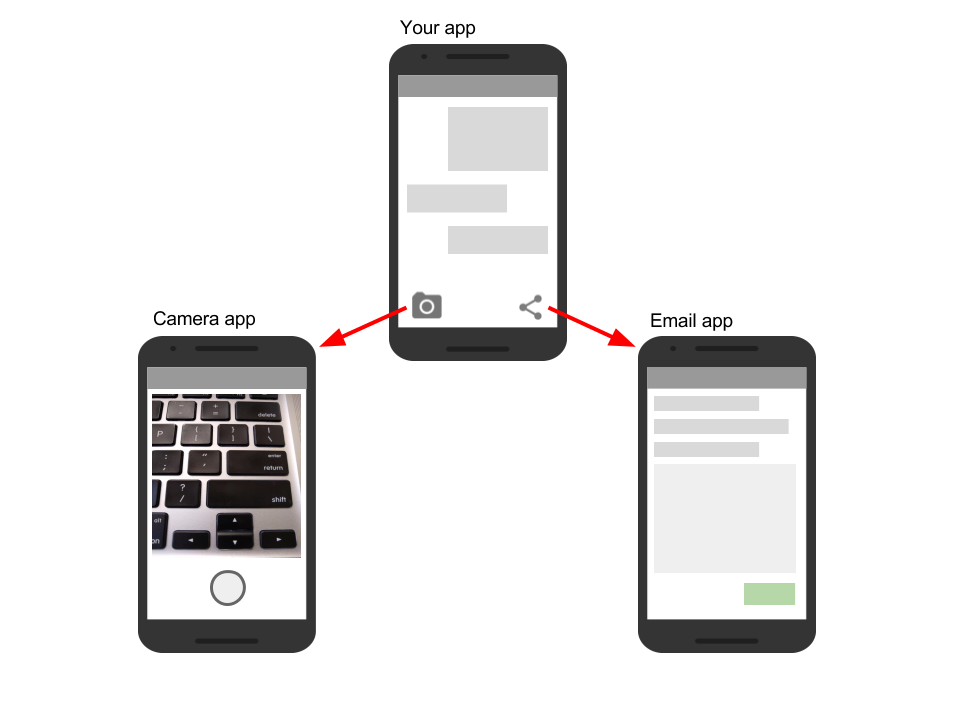
Although the activities in your app work with each other to form a cohesive user experience, each activity is independent of the others. This enables your app to start an activity in another app, and it enables other apps to start activities in your app (if your app allows this). For example, a messaging app could start an activity in a camera app to take a picture, then start an activity in an email app to let the user share the picture in email.
Typically, one Activity in an app is specified as the "main" activity, for example MainActivity. The user sees the main activity when they launch the app for the first time. Each activity can start other activities to perform different actions.
Each time a new activity starts, the previous activity is stopped, but the system preserves the activity in a stack (the "back stack"). When the user is done with the current activity and presses the Back button, the activity is popped from the stack and destroyed, and the previous activity resumes.
When an activity is stopped because a new activity starts, the first activity is notified by way of the activity lifecycle callback methods. The activity lifecycle is the set of states an Activity can be in: when the activity is first created, when it's stopped or resumed, and when the system destroys it. You learn more about the activity lifecycle in a later chapter.
Creating an Activity
To implement an Activity in your app, do the following:
Create an
ActivityJava class.Implement a basic UI for the
Activityin an XML layout file.Declare the new
Activityin theAndroidManifest.xmlfile.
When you create a new project for your app, or add a new Activity to your app by choosing File > New > Activity, the template automatically performs the steps listed above.
Create the Activity
When you create a new project in Android Studio and choose the Backwards Compatibility (AppCompat) option, the MainActivity is, by default, a subclass of the AppCompatActivity class. The AppCompatActivity class lets you use up-to-date Android app features such as the app bar and Material Design, while still enabling your app to be compatible with devices running older versions of Android.
Here is a skeleton subclass of AppCompatActivity:
The first task for you in your Activity subclass is to implement the standard Activity lifecycle callback methods (such as onCreate()) to handle the state changes for your Activity. These state changes include things such as when the Activity is created, stopped, resumed, or destroyed. You learn more about the Activity lifecycle and lifecycle callbacks in a different chapter.
The one required callback your app must implement is the onCreate() method. The system calls this method when it creates your Activity, and all the essential components of your Activity should be initialized here. Most importantly, the onCreate() method calls setContentView() to create the primary layout for the Activity.
You typically define the UI for your Activity in one or more XML layout files. When the setContentView() method is called with the path to a layout file, the system creates all the initial views from the specified layout and adds them to your Activity. This is often referred to as inflating the layout.
You may often also want to implement the onPause() method in your Activity. The system calls this method as the first indication that the user is leaving your Activity (though it does not always mean that the Activity is being destroyed). This is usually where you should commit any changes that should be persisted beyond the current user session (because the user might not come back). You learn more about onPause() and all the other lifecycle callbacks in a later chapter.
In addition to lifecycle callbacks, you may also implement methods in your Activity to handle other behavior such as user input or button clicks.
Implement the activity's UI
The UI for an activity is provided by a hierarchy of View elements, which controls a particular space within the activity window and can respond to user interaction.
The most common way to define a UI using View elements is with an XML layout file stored as part of your app's resources. Defining your layout in XML enables you to maintain the design of your UI separately from the source code that defines the activity behavior.
You can also create new View elements directly in your activity code by inserting new View objects into a ViewGroup, and then passing the root ViewGroup to setContentView(). After your layout has been inflated—regardless of its source—you can add more View elements anywhere in the View hierarchy.
Declare the Activity in AndroidManifest.xml
Each Activity in your app must be declared in the AndroidManifest.xml file with the <activity> element, inside the <application> section. When you create a new project or add a new Activity to your project in Android Studio, the AndroidManifest.xml file is created or updated to include skeleton declarations for each Activity. Here's the declaration for MainActivity:
The <activity> element includes a number of attributes to define properties of the Activity such as its label, icon, or theme. The only required attribute is android:name, which specifies the class name for the Activity (such as MainActivity). See the <activity> element reference for more information on Activity declarations.
The <activity> element can also include declarations for Intent filters. The Intent filters specify the kind of Intent your Activity will accept.
Intent filters must include at least one <action> element, and can also include a <category> and optional <data>. The MainActivity for your app needs an Intent filter that defines the "main" action and the "launcher" category so that the system can launch your app. Android Studio creates this Intent filter for the MainActivity in your project.
The <action> element specifies that this is the "main" entry point to the app. The <category> element specifies that this Activity should be listed in the system's app launcher (to allow users to launch this Activity).
Each Activity in your app can also declare Intent filters, but only your MainActivity should include the "main" action. You learn more about how to use an implicit Intent and Intent filters in a later section.
Last updated