> For the complete documentation index, see [llms.txt](https://0xa1mn.gitbook.io/cyber-explained/llms.txt). Markdown versions of documentation pages are available by appending `.md` to page URLs; this page is available as [Markdown](https://0xa1mn.gitbook.io/cyber-explained/technologies/android-application/application-file-structure.md).
# Application File Structure
### **Application code**
To view and edit the Java code, expand the `app` folder, the `java` folder, and the `com.example.android.helloworld` folder. Double-click the `MainActivity` `java` file to open it in the code editor.
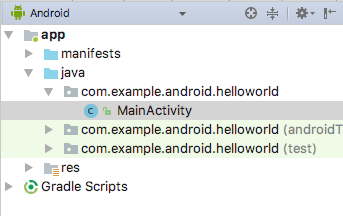
The `java` folder includes Java class files. Each [`Activity`](https://developer.android.com/reference/android/app/Activity.html), [`Service`](https://developer.android.com/reference/android/app/Service.html), or other component (such as a [`Fragment`](https://developer.android.com/reference/android/app/Fragment.html)) is defined as a Java class, usually in its own file. Tests and other Java class files are also located here.
The `java` folder contains three subfolders:
* `com.example.hello.helloworld` (or the domain name you have specified)**:** All the files for a package are in a folder named after the package. For your Hello World app, there is one package, and it contains only `MainActivity.java`. The first `Activity` (screen) that the user sees, which also initializes app-wide resources, is customarily called `MainActivity`. (The file extension is omitted in the **Project > Android** pane.)
* `com.example.hello.helloworld(androidTest)`: This folder is for your instrumented tests, and starts out with a skeleton test file.
* `com.example.hello.helloworld(test)`: This folder is for your unit tests and starts out with an automatically created skeleton unit test file.
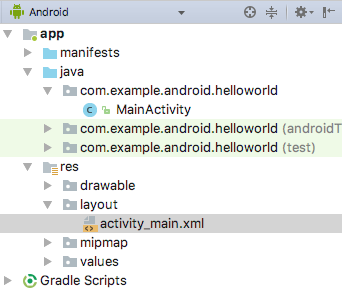
### **Layout files**
To view and edit a layout file, expand the `res` folder and the `layout` folder to see the layout file. In the figure below, the layout file is called `activity_main.xml`.
Double-click the file to open it in the layout editor. Layout files are written in XML.
### **Resource files**
The `res` folder holds resources, such as layouts, strings, and images. An `Activity` is usually associated with a layout of UI views that are defined as an XML file. This XML file is usually named after its `Activity`. The `res` folder includes these subfolders:
* `drawable`: Store all your app's images in this folder.
* `layout`: Every `Activity` has at least one XML layout file that describes the UI. For Hello World, this folder contains `activity_main.xml`.
* `mipmap`: The launcher icons are stored in this folder. There is a subfolder for each supported screen density. Android uses the screen density (the number of pixels per inch) to determine the required image resolution. Android groups all actual screen densities into generalized densities, such as medium (mdpi), high (hdpi), or extra-extra-extra-high (xxxhdpi). The `ic_launcher.png` folder contains the default launcher icons for all the densities supported by your app.
* `values`: Instead of hardcoding values like strings, dimensions, and colors in your XML and Java files, it is best practice to define them in their respective `values` files. This practice makes it easier to change the values and keep the values consistent across your app.
The `values` subfolder includes these subfolders:
* `colors.xml`: Shows the default colors for your chosen theme. You can add your own colors or change the colors based on your app's requirements.
* `dimens.xml`: Store the sizes of views and objects for different resolutions.
* `strings.xml`: Create resources for all your strings. Doing this makes it easy to translate the strings to other languages.
* `styles.xml`**:** All the styles for your app and theme go here. Styles help give your app a consistent look for all UI elements.
### Using the editor pane
If you select a file, the editor pane appears. A tab appears for the file so that you can open multiple files and switch between them. For example, if you double-click the **activity\_main.xml** layout file in the **Project > Android** pane, the layout editor appears as shown below.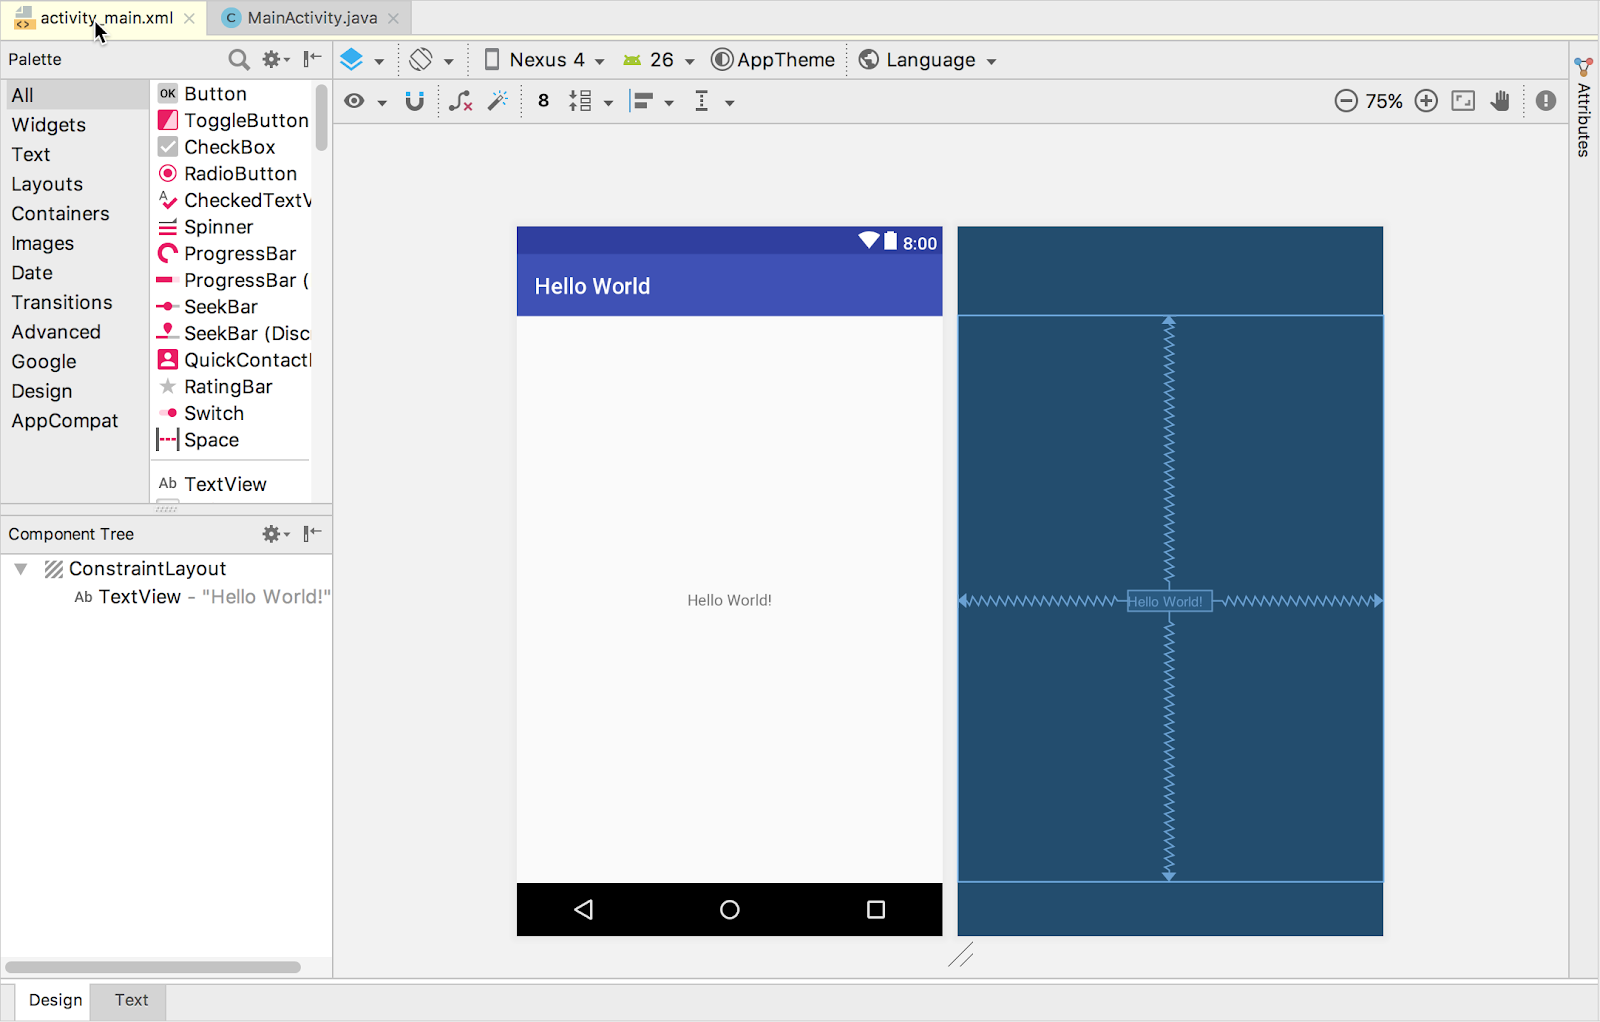
If you double-click the **MainActivity** file in the **Project > Android** pane, the editor changes to the code editor as shown below, with a tab for **MainActivity.java**: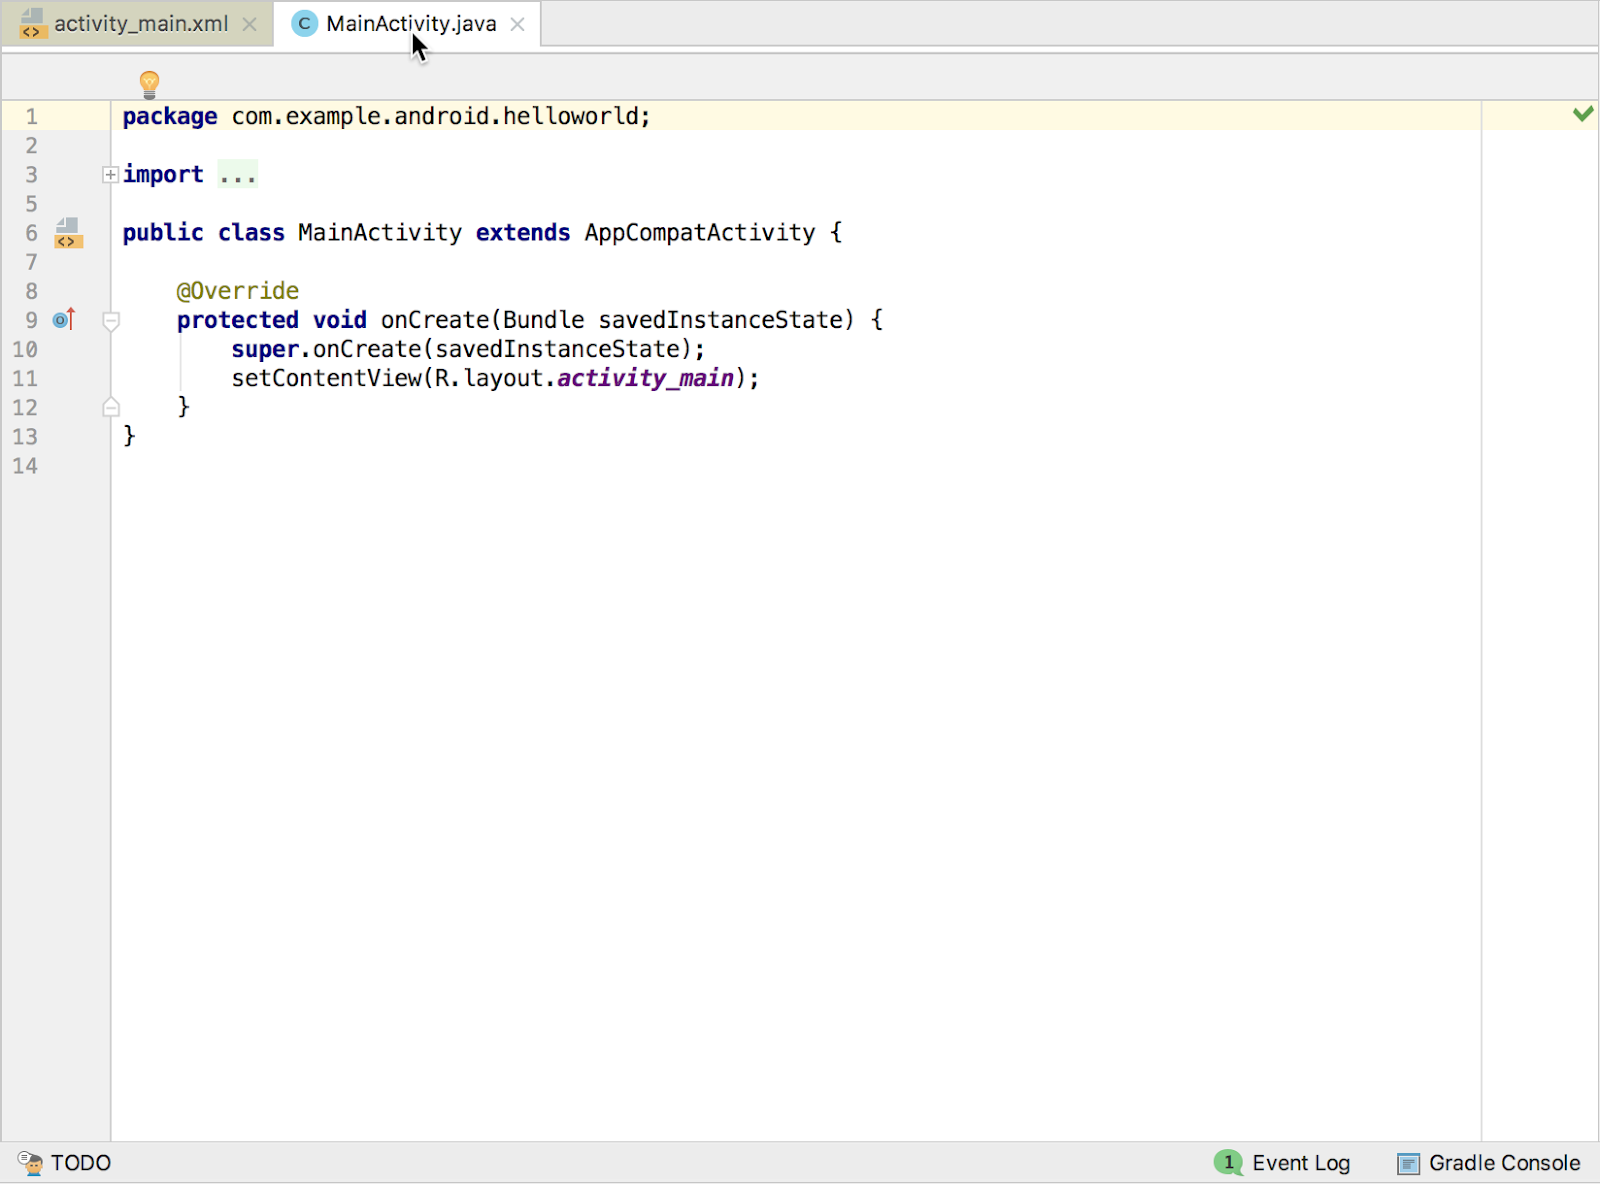
At the top of the `MainActivity.java` file is a `package` statement that defines the app package. This package statement is followed by an `import` block condensed with `...`, as shown in the figure above. Click the dots to expand the block to view it. The `import` statements import libraries needed for the app. For example, the following statement imports the `AppCompatActivity` library:
```
import android.support.v7.app.AppCompatActivity;
```
Each `Activity` in an app is implemented as a Java class. The following class declaration extends the `AppCompatActivity` class to implement features in a way that is backward-compatible with previous versions of Android:
```
public class MainActivity extends AppCompatActivity {
// ... Rest of the code for the class.
}
```
### Android manifest
Before the Android system can start an app component such as an `Activity`, the system must know that the `Activity` exists. It does so by reading the app's `AndroidManifest.xml` file, which describes all of the components of your Android app. Each `Activity` must be listed in this XML file, along with all components for the app.
To view and edit the `AndroidManifest.xml` file, expand the `manifests` folder in the **Project > Android** pane, and double-click `AndroidManifest.xml`. Its contents appear in the editing pane:
```
```
### Namespace and application tag
The Android Manifest is coded in XML and always uses the Android namespace:
```
xmlns:android="http://schemas.android.com/apk/res/android"
package="com.example.android.helloworld">
```
The `package` expression shows the unique package name of the new app. Do not change the package expression after the app is published.
The `` tag, with its closing `` tag, defines the manifest settings for the entire app.
### Automatic backup
The `android:allowBackup` attribute enables automatic app data backup:
```
android:allowBackup="true"
```
Setting the `android:allowBackup` attribute to `true` enables the app to be backed up automatically and restored as needed. Users invest time and effort to configure apps. Switching to a new device can cancel out all that careful configuration. The system performs this automatic backup for nearly all app data by default, and does so without the developer having to write any additional app code.
For apps whose target SDK version is Android 6.0 (API level 23) and higher, devices running Android 6.0 and higher automatically create backups of app data to the cloud because the `android:allowBackup` attribute defaults to `true` if omitted. For apps < API level 22 you have to explicitly add the `android:allowBackup` attribute and set it to `true`.
### Declaring the Android version
Different devices may run different versions of the Android system, such as Android 4.0 or Android 4.4. Each successive version can add new APIs not available in the previous version. To indicate which set of APIs are available, each version specifies an API level. For instance, Android 1.0 is API level 1 and Android 4.4 is API level 19.
The API level allows a developer to declare the minimum version with which the app is compatible, using the `` manifest tag and its `minSdkVersion` attribute. For example, the Calendar Provider APIs were added in Android 4.0 (API level 14). If your app can't function without these APIs, declare API level 14 as the app's minimum supported version like this:
```
// ... Rest of manifest information
```
The `minSdkVersion` attribute declares the minimum version for the app, and the `targetSdkVersion` attribute declares the highest (newest) version which has been optimized within the app. Each successive version of Android provides compatibility for apps that were built using the APIs from previous versions, so the app should *always* be compatible with future versions of Android while using the documented Android APIs.
The `targetSdkVersion` attribute does *not* prevent an app from being installed on Android versions that are higher (newer) than the specified value. Even so, the target attribute is important, because it indicates to the system whether the app should inherit behavior changes in newer versions.
If you don't update the `targetSdkVersion` to the latest version, the system assumes that your app requires backward-compatible behaviors when it runs on the latest version. For example, among the behavior changes in Android 4.4, alarms created with the `AlarmManager` APIs are now inexact by default so that the system can batch app alarms and preserve system power. If your target API level is lower than `"19"`, the system retains the previous API's behavior for your app.
### build process
The Android application package (APK) is the package file format for distributing and installing Android mobile apps. The build process involves tools and processes that automatically convert each project into an APK.
Android Studio uses Gradle as the foundation of the build system, with more Android-specific capabilities provided by the Android Plugin for Gradle. This build system runs as an integrated tool from the Android Studio menu.
---
# Agent Instructions
This documentation is published with GitBook. GitBook is the documentation platform designed so that both humans and AI agents can read, navigate, and reason over technical content effectively. Learn more at gitbook.com.
## Querying This Documentation
If you need additional information that is not directly available in this page, you can query the documentation dynamically by asking a question.
Perform an HTTP GET request on the current page URL with the `ask` query parameter, and the optional `goal` query parameter:
```
GET https://0xa1mn.gitbook.io/cyber-explained/technologies/android-application/application-file-structure.md?ask=&goal=
```
`ask` is the immediate question: it should be specific, self-contained, and written in natural language.
`goal` is optional and describes the broader end goal you are ultimately trying to accomplish on behalf of the user. GitBook uses it to tailor the answer towards what is most useful for that goal.
The response will contain a direct answer to the question and relevant excerpts and sources from the documentation.
Use this mechanism when the answer is not explicitly present in the current page, you need clarification or additional context, or you want to retrieve related documentation sections.