Layout and Resources for UI
Views
The UI consists of a hierarchy of objects called views — every element of the screen is a View. The View class represents the basic building block for all UI components, and the base class for classes that provide interactive UI components such as buttons, checkboxes, and text entry fields.
A View has a location, expressed as a pair of left and top coordinates, and two dimensions, expressed as a width and a height. The unit for location and dimensions is the density-independent pixel (dp).
The Android system provides hundreds of predefined View subclasses. Commonly used View subclasses described over several lessons include:
TextViewfor displaying textEditTextto enable the user to enter and edit textButtonand other clickable elements (such asRadioButton,CheckBox, andSpinner) to provide interactive behaviorScrollViewandRecyclerViewto display scrollable itemsImageViewfor displaying imagesConstraintLayoutandLinearLayoutfor containing other views and positioning them
You can define a View to appear on the screen and respond to a user tap. A View can also be defined to accept text input, or to be invisible until needed.
You can specify View elements in layout resource files. Layout resources are written in XML and listed within the layout folder in the res folder in the Project > Android pane.
ViewGroup groups
View elements can be grouped inside a ViewGroup, which acts as a container. The relationship is parent-child, in which the parent is a ViewGroup, and the child is a View or another ViewGroup. The following are commonly used ViewGroup groups:
ConstraintLayout: A group that places UI elements (childViewelements) using constraint connections to other elements and to the layout edges (parentView).ScrollView: A group that contains one other childViewelement and enables scrolling the childViewelement.RecyclerView: A group that contains a list of otherViewelements orViewGroupgroups and enables scrolling them by adding and removingViewelements dynamically from the screen.
Layout ViewGroup groups
The View elements for a screen are organized in a hierarchy. At the root of this hierarchy is a ViewGroup that contains the layout of the entire screen. The ViewGroup can contain child View elements or other ViewGroup groups as shown in the following figure.

In the figure above:
The root
ViewGroup.The first set of child
Viewelements andViewGroupgroups whose parent is the root.
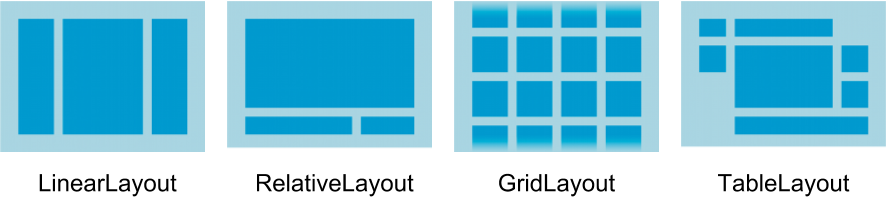
Some ViewGroup groups are designated as layouts because they organize child View elements in a specific way and are typically used as the root ViewGroup. Some examples of layouts are:
ConstraintLayout: A group of childViewelements using constraints, edges, and guidelines to control how the elements are positioned relative to other elements in the layout.ConstraintLayoutwas designed to make it easy to click and dragViewelements in the layout editor.LinearLayout: A group of childViewelements positioned and aligned horizontally or vertically.RelativeLayout: A group of childViewelements in which each element is positioned and aligned relative to other elements within theViewGroup. In other words, the positions of the childViewelements can be described in relation to each other or to the parentViewGroup.TableLayout: A group of childViewelements arranged into rows and columns.FrameLayout: A group of childViewelements in a stack.FrameLayoutis designed to block out an area on the screen to display oneView. ChildViewelements are drawn in a stack, with the most recently added child on top. The size of theFrameLayoutis the size of its largest childViewelement.GridLayout: A group that places its childViewelements in a rectangular grid that can be scrolled.
Tip: Learn more about different layout types in Common Layout Objects.
A simple example of a LinearLayout with child View elements is shown below as a diagram of the layout file (activity_main.xml), along with a hierarchy diagram (top right) and a screenshot of the actual finished layout (bottom right).
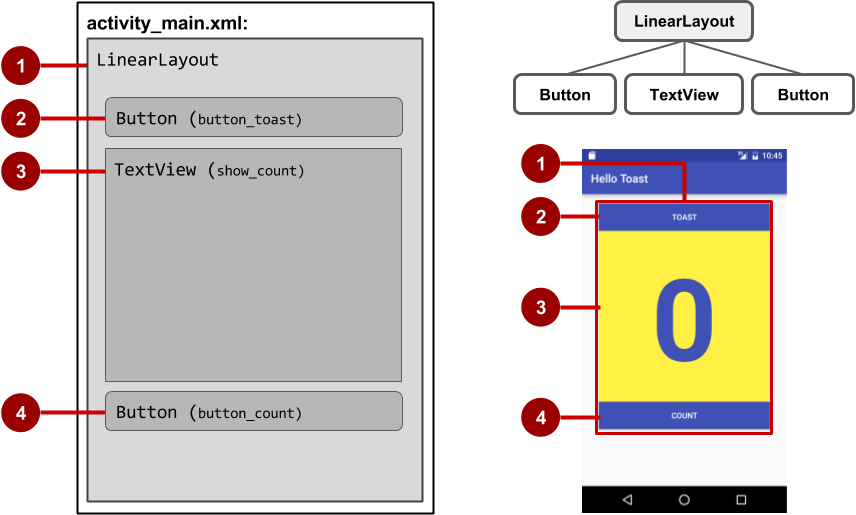
In the figure above:
LinearLayout, the rootViewGroup, contains all the childViewelements in a vertical orientation.Button(button_toast). The first childViewelement appears at the top in theLinearLayout.TextView(show_count). The second childViewelement appears under the first childViewelement in theLinearLayout.Button(button_count). The third childViewelement appears under the second childViewelement in theLinearLayout.
The layout hierarchy can grow to be complex for an app that shows many View elements on a screen. It's important to understand the hierarchy, as it affects whether View elements are visible and how efficiently they are drawn.
Resource files
Resource files are a way of separating static values from code so that you don't have to change the code itself to change the values. You can store all the strings, layouts, dimensions, colors, styles, and menu text separately in resource files.
Resource files are stored in folders located in the res folder when viewing the Project > Android pane. These folders include:
drawable: For images and iconslayout: For layout resource filesmenu: For menu itemsmipmap: For pre-calculated, optimized collections of app icons used by the Launchervalues: For colors, dimensions, strings, and styles (theme attributes)
The syntax to reference a resource in an XML layout is as follows:
@package_name:resource_type/resource_name
package_name is the name of the package in which the resource is located. The package name is not required when you reference resources that are stored in the
resfolder of your project, because these resources are from the same package.resource_type is the
Rsubclass for the resource type. See Resource Types for more about the resource types and how to reference them.resource_name is either the resource filename without the extension, or the
android:nameattribute value in the XML element.
For example, the following XML layout statement sets the android:text attribute to a string resource:
No package_name is included, because the resource is stored in the
strings.xmlfile in the project.The resource_type is
string.The resource_name is
button_label_toast.
Another example: this XML layout statement sets the android:background attribute to a color resource, and since the resource is defined in the project (in the colors.xml file), the package_name is not specified:
In the following example, the XML layout statement sets the android:textColor attribute to a color resource. However, the resource is not defined in the project but supplied by Android, so you need to specify the package_name, which is android, followed by a colon:
Tip: For more about accessing resources from code, see Accessing Resources. For Android color constants, see the Android standard R.color resources.
Values resource files
Keeping values such as strings and colors in separate resource files makes it easier to manage them, especially if you use them more than once in your layouts.
For example, it is essential to keep strings in a separate resource file for translating and localizing your app, so that you can create a string resource file for each language without changing your code. Resource files for images, colors, dimensions, and other attributes are handy for developing an app for different device screen sizes and orientations.
Strings
String resources are located in the strings.xml file (inside res > values in the Project > Android pane). You can edit this file directly by opening it in the editor pane:
The name (for example, button_label_count) is the resource name you use in your XML code, as in the following attribute:
The string value of this name is the word (Count) enclosed within the <string></string> tags. (You don't use quotation marks unless the quotation marks are part of the string value.)
Extracting strings to resources
You should also extract hard-coded strings in an XML layout file to string resources.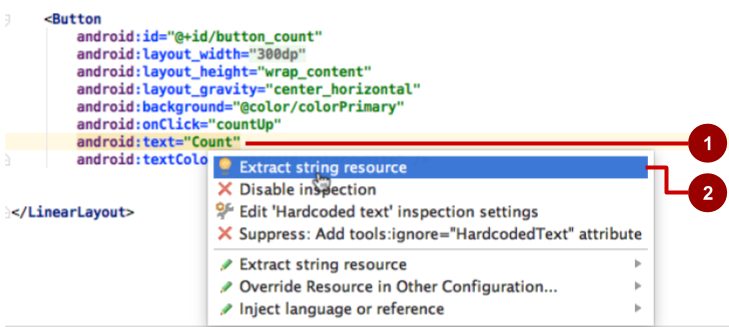

To extract a hard-coded string in an XML layout, follow these steps, as shown in the figure above:
Click the hard-coded string and press Alt-Enter in Windows, or Option-Return in Mac OS X.
Select Extract string resource.
Edit the Resource name for the string value.
You can then use the resource name in your XML code. Use the expression "@string/resource_name" (including quotation marks) to refer to the string resource:
Last updated