> For the complete documentation index, see [llms.txt](https://0xa1mn.gitbook.io/cyber-explained/llms.txt). Markdown versions of documentation pages are available by appending `.md` to page URLs; this page is available as [Markdown](https://0xa1mn.gitbook.io/cyber-explained/technologies/android-application/implicit-intents.md).
# Implicit intents
### Understanding an implicit Intent
In an earlier chapter you learned how to start an activity from an activity by specifying the class name of the activity to start in an *explic*it intent. This is the most basic way to use an intent: To start an [`Intent`](http://developer.android.com/reference/android/content/Intent.html) or other app component and pass data to it (and sometimes receive data).
A more flexible use of an [`Intent`](http://developer.android.com/reference/android/content/Intent.html) is the *implicit* intent. You don't specify the exact activity (or other component) to run—instead, you include just enough information in the intent about the task you want to perform. The Android system matches the information in your request intent with any activity available on the device that can perform that task. If there's only one activity that matches, that activity is launched. If more than one activity matches the intent, the user is presented with an app chooser and picks which app they would like to perform the task.
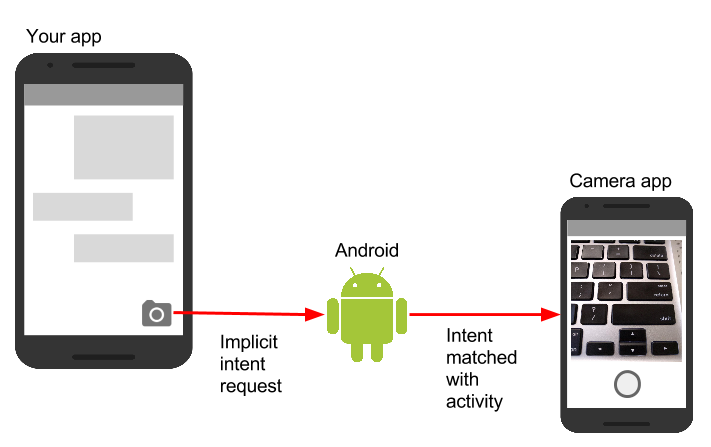
For example, you have an app that lists available snippets of video. If the user touches an item in the list, you want to play that video snippet. Rather than implementing an entire video player in your own app, you can launch an `Intent` that specifies the task as "play an object of type video." The Android system then matches your request with an `Activity` that has registered itself to play objects of type video.
An `Activity` registers itself with the system as being able to handle an implicit `Intent` with `Intent` *filters*, declared in the `AndroidManifest.xml` file. For example, the main `Activity` (and only the main `Activity`) for your app has an `Intent` filter that declares it the main `Activity` for the launcher category. This `Intent` filter is how the Android system knows to start that specific `Activity` in your app when the user taps the icon for your app on the device home screen.
#### Intent actions, categories, and data
An implicit `Intent`, like an explicit `Intent`, is an instance of the [`Intent`](http://developer.android.com/reference/android/content/Intent.html) class. In addition to the parts of an `Intent` you learned about in an earlier chapter (such as the `Intent` data and extras), these fields are used by an implicit `Intent`:
* The `Intent` *action*, which is the generic action the receiving `Activity` should perform. The available `Intent` actions are defined as constants in the [`Intent`](http://developer.android.com/reference/android/content/Intent.html) class and begin with the word `ACTION_`. A common `Intent` action is `ACTION_VIEW`, which you use when you have some information that an `Activity` can show to the user, such as a photo to view in a gallery app, or an address to view in a map app. You can specify the action for an `Intent` in the `Intent` constructor, or with the `setAction()` method.
* An `Intent` *category*, which provides additional information about the category of component that should handle the `Intent`. `Intent` categories are optional, and you can add more than one category to an `Intent`. `Intent` categories are also defined as constants in the `Intent` class and begin with the word `CATEGORY_`. You can add categories to the `Intent` with the `addCategory()` method.
* The data *type*, which indicates the MIME type of data the `Activity` should operate on. Usually, the data type is inferred from the URI in the `Intent` data field, but you can also explicitly define the data type with the `setType()` method.
`Intent` actions, categories, and data types are used both by the `Intent` object you create in your sending `Activity`, as well as in the `Intent` filters you define in the `AndroidManifest.xml` file for the receiving `Activity`. The Android system uses this information to match an implicit `Intent` request with an `Activity` or other component that can handle that `Intent`.
### Sending an implicit Intent
Starting an `Activity` with an implicit `Intent`, and passing data from one `Activity` to another, works much the same way as it does for an explicit `Intent`:
1. In the sending `Activity`, create a new `Intent` object.
2. Add information about the request to the `Intent` object, such as data or extras.
3. Send the `Intent` with `startActivity()` (to just start the `Activity`) or `startActivityforResult()` (to start the `Activity` and expect a result back).
When you create an implicit `Intent` object, you:
* Do *not* specify the specific `Activity` or other component to launch.
* Add an `Intent` action or `Intent` categories (or both).
* Resolve the `Intent` with the system before calling `startActivity()` or `startActivityforResult()`.
* Show an app chooser for the request (optional).
#### Create implicit Intent objects
To use an implicit `Intent`, create an `Intent` object as you did for an explicit `Intent`, only without the specific component name.
```
Intent sendIntent = new Intent();
```
You can also create the `Intent` object with a specific action:
```
Intent sendIntent = new Intent(Intent.ACTION_VIEW);
```
Once you have an `Intent` object you can add other information (category, data, extras) with the various `Intent` methods. For example, this code creates an implicit `Intent` object, sets the `Intent` action to `ACTION_SEND`, defines an `Intent` extra to hold the text, and sets the type of the data to the MIME type `"text/plain"`.
```
Intent sendIntent = new Intent();
sendIntent.setAction(Intent.ACTION_SEND);
sendIntent.putExtra(Intent.EXTRA_TEXT, textMessage);
sendIntent.setType("text/plain");
```
#### Resolve the Activity before starting it
When you define an implicit `Intent` with a specific action and/or category, there is a possibility that there won't be *any* `Activity` on the device that can handle your request. If you just send the `Intent` and there is no appropriate match, your app will crash.
To verify that an `Activity` or other component is available to receive your `Intent`, use the `resolveActivity()` method with the system package manager like this:
```
if (sendIntent.resolveActivity(getPackageManager()) != null) {
startActivity(chooser);
}
```
If the result of `resolveActivity()` is not `null`, then there is at least one app available that can handle the `Intent`, and it's safe to call `startActivity()`. Do not send the `Intent` if the result is `null`.
If you have a feature that depends on an external `Activity` that may or may not be available on the device, a best practice is to test for the availability of that external `Activity` before the user tries to use it. If there is no `Activity` that can handle your request (that is, `resolveActivity()` returns `null`), disable the feature or provide the user an error message for that feature.
#### Show the app chooser
To find an `Activity` or other component that can handle your `Intent` requests, the Android system matches your implicit `Intent` with an `Activity` whose `Intent` filters indicate that they can perform that action. If there are multiple apps installed that match, the user is presented with an app chooser that lets them select which app they want to use to handle that `Intent`.
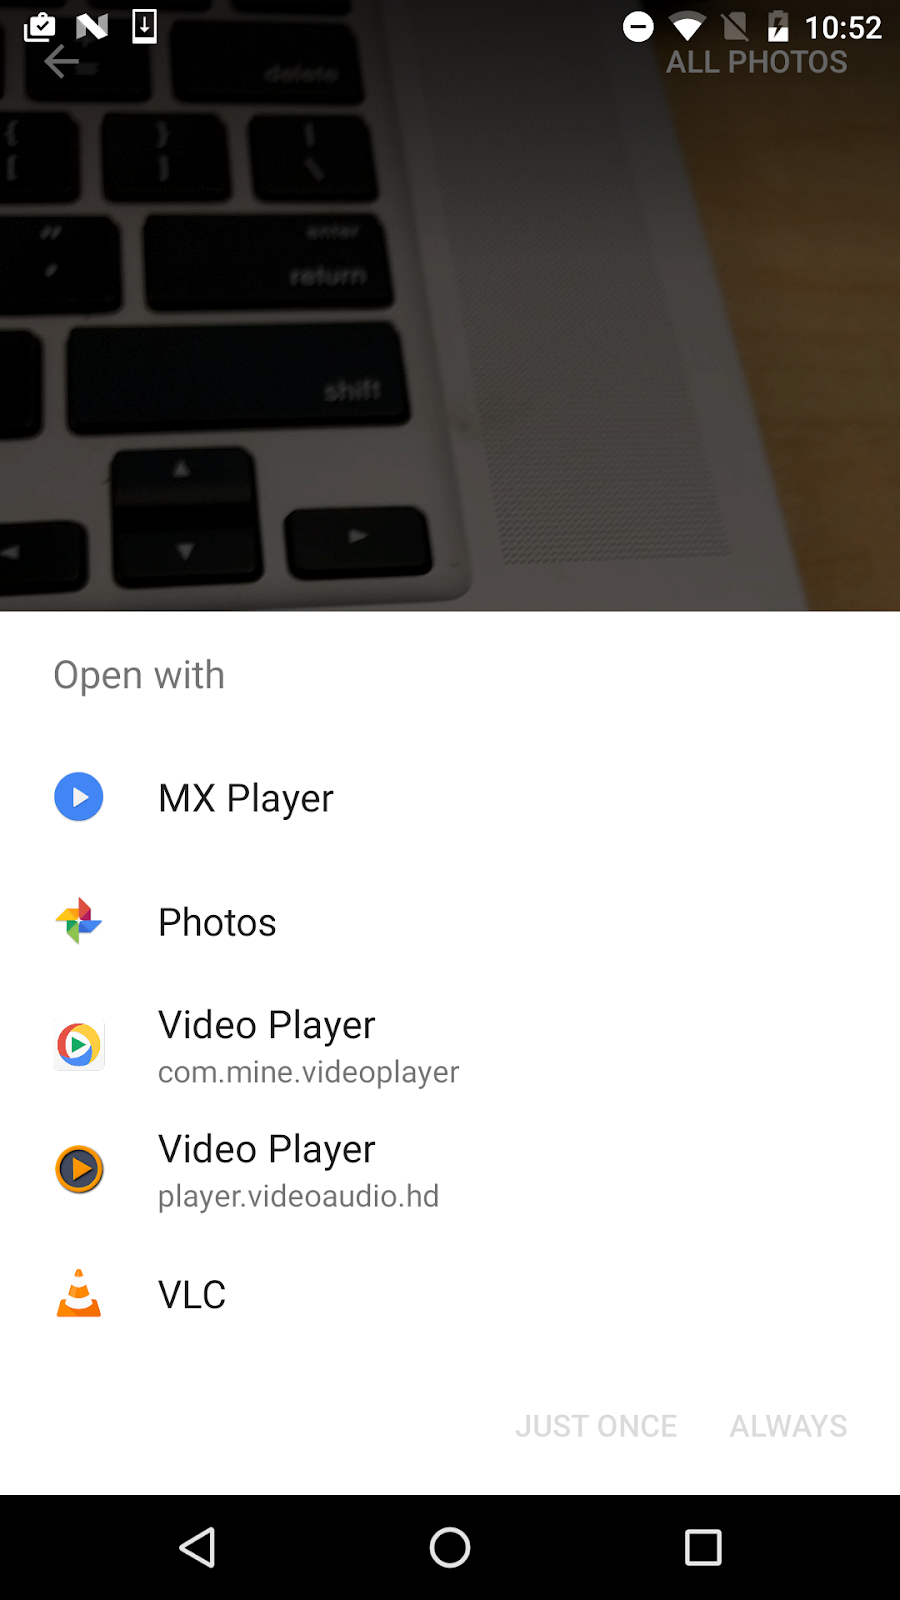
In many cases the user has a preferred app for a given task, and they will select the option to always use that app for that task. However, if multiple apps can respond to the `Intent` and the user might want to use a different app each time, you can choose to explicitly show a chooser dialog every time. For example, when your app performs a "share this" action with the [`ACTION_SEND`](https://developer.android.com/reference/android/content/Intent.html#ACTION_SEND) action, users may want to share using a different app depending on the current situation.
To show the chooser, you create a wrapper `Intent` for your implicit `Intent` with the `createChooser()` method, and then resolve and call `startActivity()` with that wrapper `Intent`. The `createChooser()` method also requires a string argument for the title that appears on the chooser. You can specify the title with a string resource as you would any other string.
For example:
```
// The implicit Intent object
Intent sendIntent = new Intent(Intent.ACTION_SEND);
// Always use string resources for UI text.
String title = getResources().getString(R.string.chooser_title);
// Create the wrapper intent to show the chooser dialog.
Intent chooser = Intent.createChooser(sendIntent, title);
// Resolve the intent before starting the activity
if (sendIntent.resolveActivity(getPackageManager()) != null) {
startActivity(chooser);
}
```
### Receiving an implicit Intent
If you want an `Activity` in your app to respond to an implicit `Intent` (from your own app or other apps), declare one or more `Intent` filters in the `AndroidManifest.xml` file. Each `Intent` filter specifies the type of `Intent` it accepts based on the action, data, and category for the `Intent`. The system will deliver an implicit `Intent` to your app component only if that `Intent` can pass through one of your `Intent` filters.
**Note:** An explicit `Intent` is always delivered to its target, regardless of any `Intent` filters the component declares. Conversely, if an `Activity` does not include `Intent` filters, it can only be launched with an explicit `Intent`.
Once your `Activity` is successfully launched with an implicit `Intent`, you can handle that `Intent` and its data the same way you did an explicit `Intent`, by:
1. Getting the `Intent` object with `getIntent()`.
2. Getting `Intent` data or extras out of that `Intent`.
3. Performing the task the `Intent` requested.
4. Returning data to the calling `Activity` with another `Intent`, if needed.
#### Intent filters
Define `Intent` filters with one or more `` elements in the `AndroidManifest.xml` file, nested in the corresponding `` element. Inside ``, specify the type of intent your activity can handle. The Android system matches an implicit intent with an activity or other app component only if the fields in the `Intent` object match the `Intent` filters for that component.
An `Intent` filter may contain the following elements, which correspond to the fields in the `Intent` object described above:
* ``: The `Intent` action that the activity accepts.
* ``: The type of data accepted, including the MIME type or other attributes of the data URI (such as scheme, host, port, and path).
* ``: The `Intent` category.
For example, the main `Activity` for your app includes this `` element, which you saw in an earlier chapter:
```
```
This `Intent` filter has the action `MAIN` and the category `LAUNCHER`. The `` element specifies that this is the app's "main" entry point. The `` element specifies that this activity should be listed in the system's app launcher (to allow users to launch the activity). Only the main activity for your app should have this `Intent` filter.
Here's another example for an implicit `Intent` that shares a bit of text. This `Intent` filter matches the implicit `Intent` example from the previous section:
```
```
You can specify more than one action, data, or category for the same `Intent` filter, or have multiple `Intent` filters per `Activity` to handle each different kind of `Intent`.
The Android system tests an implicit `Intent` against an `Intent` filter by comparing the parts of that `Intent` to each of the three `Intent` filter elements (action, category, and data). The `Intent` must pass all three tests or the Android system won't deliver the `Intent` to the component. However, because a component may have multiple `Intent` filters, an `Intent` that does not pass through one of a component's filters might make it through on another filter.
#### Actions
An `Intent` filter can declare zero or more `` elements for the `Intent` action. The action is defined in the name attribute, and consists of the string `"android.intent.action."` plus the name of the `Intent` action, minus the `ACTION_` prefix. So, for example, an implicit `Intent` with the action `ACTION_VIEW` matches an `Intent` filter whose action is `android.intent.action.VIEW.`
For example, this `Intent` filter matches either `ACTION_EDIT` and `ACTION_VIEW`:
```
```
To get through this filter, the action specified in the incoming `Intent` object must match at least one of the actions. You must include at least one `Intent` action for an incoming implicit `Intent` to match.
#### Categories
An `Intent` filter can declare zero or more `` elements for `Intent` categories. The category is defined in the name attribute, and consists of the string `"android.intent.category."` plus the name of the `Intent` category, minus the `CATEGORY` prefix.
For example, this `Intent` filter matches either `CATEGORY_DEFAULT` and `CATEGORY_BROWSABLE`:
```
```
Note that any `Activity` that you want to accept an implicit `Intent` must include the `android.intent.category.DEFAULT` `Intent` filter. This category is applied to all implicit `Intent` objects by the Android system.
#### Data
An `Intent` filter can declare zero or more `` elements for the URI contained in the `Intent` data. As the `Intent` data consists of a URI and (optionally) a MIME type, you can create an `Intent` filter for various aspects of that data, including:
* URI Scheme
* URI Host
* URI Path
* Mime type
For example, this `Intent` filter matches any data `Intent` with a URI scheme of `http` and a MIME type of either `"video/mpeg"` or `"audio/mpeg"`.
```
```
### Sharing data using ShareCompat.IntentBuilder
Share actions are an easy way for users to share items in your app with social networks and other apps. Although you can build a share action in your own app using an implicit `Intent` with the `ACTION_SEND` action, Android provides the [`ShareCompat.IntentBuilder`](http://developer.android.com/reference/android/support/v4/app/ShareCompat.IntentBuilder.html) helper class to easily implement sharing in your app.
**Note:** For apps that target Android releases after API 14, you can use the `ShareActionProvider` class for share actions instead of `ShareCompat.IntentBuilder`. The `ShareCompat` class is part of the V4 support library, and allows you to provide share actions in apps in a backward-compatible fashion. `ShareCompat` provides a single API for sharing on both old and new Android devices. You learn more about the Android support libraries in another chapter.
With the `ShareCompat.IntentBuilder` class you do not need to create or send an implicit `Intent` for the share action. Use the methods in [`ShareCompat.IntentBuilder`](http://developer.android.com/reference/android/support/v4/app/ShareCompat.IntentBuilder.html) to indicate the data you want to share as well as any additional information. Start with the `from()` method to create a new `Intent` builder, add other methods to add more data, and end with the `startChooser()` method to create and send the `Intent`. You can chain the methods together like this:
```
ShareCompat.IntentBuilder
.from(this) // information about the calling activity
.setType(mimeType) // mime type for the data
.setChooserTitle("Share this text with: ") //title for the app chooser
.setText(txt) // intent data
.startChooser(); // send the intent
```
### Managing tasks
In a previous chapter you learned about tasks and the back stack. The task for your app contains its own stack that contains each `Activity` the user has visited while using your app. As the user navigates around your app, `Activity` instances for that task are pushed and popped from the stack for that task.
Most of the time the user's navigation from one `Activity` to another `Activity` and back again through the stack is straightforward. Depending on the design and navigation of your app there may be complications, especially with an `Activity` started from another app and other tasks.
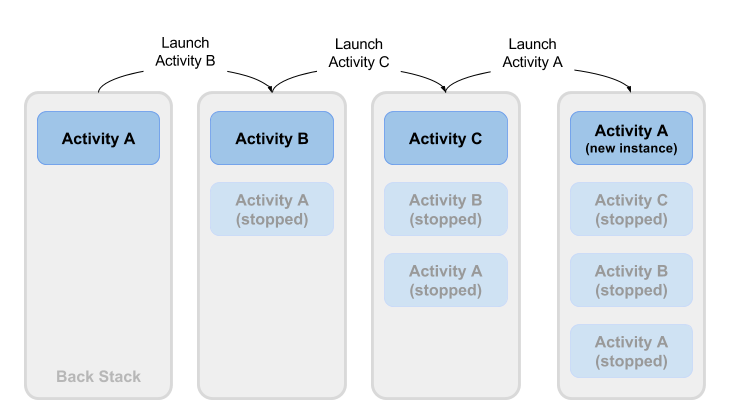
For example, say you have an app with three `Activity` objects: A, B, and C. A launches B with an `Intent`, and B launches C. C, in turn sends an `Intent` to launch A. In this case the system creates a *second instance* of A on the top of the stack, rather than bringing the already-running instance to the foreground. Depending on how you implement each `Activity`, the two instances of A can get out of sync and provide a confusing experience for a user navigating back through the stack.
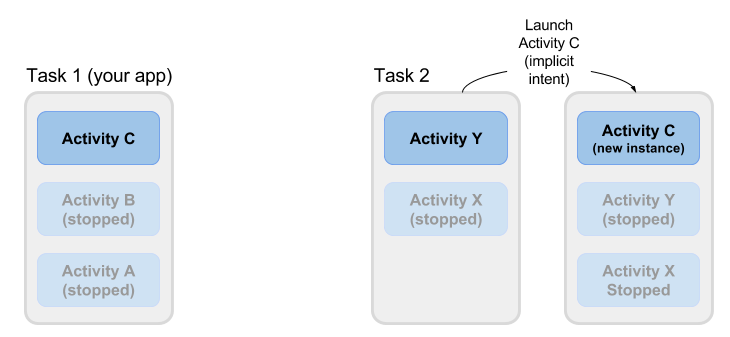
Or, say your `Activity` C can be launched from a second app with an implicit `Intent`. The user runs the second app, which has its own task and its own back stack. If that app uses an implicit `Intent` to launch your `Activity` C, a new instance of C is created and placed on the back stack for that second app's task. Your app still has its own task, its own back stack, and its own instance of C.
Much of the time the Android's default behavior for tasks works fine and you don't have to worry about how each `Activity` is associated with tasks, or how they exist in the back stack. If you want to change the normal behavior, Android provides a number of ways to manage tasks and each `Activity` within those tasks, including:
* `Activity` launch modes, to determine how an `Activity` should be launched.
* Task affinities, which indicate which task a launched `Activity` belongs to.
### Activity launch modes
Use `Activity` launch modes to indicate how each new `Activity` should be treated when launched—that is, if the `Activity` should be added to the current task, or launched into a new task. Define launch modes for the `Activity` with attributes on the `` element of the `AndroidManifest.xml` file, or with flags set on the `Intent` that starts that `Activity`.
#### Activity attributes
To define a launch mode for an `Activity` add the `android:launchMode` attribute to the `` element in the `AndroidManifest.xml` file. This example uses a launch mode of `"standard"`, which is the default.
```
```
There are four launch modes available as part of the `` element:
* `"standard"` (the default): A new `Activity` is launched and added to the back stack for the current task. An `Activity` can be instantiated multiple times, a single task can have multiple instances of the same `Activity`, and multiple instances can belong to different tasks.
* `"singleTop"`: If an instance of an `Activity` exists at the top of the back stack for the current task and an `Intent` request for that `Activity` arrives, Android routes that `Intent` to the existing `Activity` instance rather than creating a new instance. A new `Activity` is still instantiated if there is an existing `Activity` anywhere in the back stack other than the top.
* `"singleTask"`: When the `Activity` is launched the system creates a new task for that `Activity`. If another task already exists with an instance of that `Activity`, the system routes the `Intent` to that `Activity` instead.
* `"singleInstance"`: Same as single task, except that the system doesn't launch any other `Activity` into the task holding the `Activity` instance. The `Activity` is always the single and only member of its task.
The vast majority of apps will only use the standard or single top launch modes. See the [`android:launchMode`](https://developer.android.com/guide/topics/manifest/activity-element.html#lmode) attribute for more detailed information on launch modes.
#### Intent flags
`Intent` flags are options that specify how the activity (or other app component) that receives the intent should handle that intent. `Intent` flags are defined as constants in the `Intent` class and begin with the word `FLAG_`. You add `Intent` flags to an `Intent` object with `setFlag()` or `addFlag()`.
Three specific `Intent` flags are used to control activity launch modes, either in conjunction with the `launchMode` attribute or in place of it. `Intent` flags always take precedence over the launch mode in case of conflicts.
* [`FLAG_ACTIVITY_NEW_TASK`](https://developer.android.com/reference/android/content/Intent.html#FLAG_ACTIVITY_NEW_TASK): start the `Activity` in a new task. This behavior is the same as for `singleTask` launch mode.
* [`FLAG_ACTIVITY_SINGLE_TOP`](https://developer.android.com/reference/android/content/Intent.html#FLAG_ACTIVITY_SINGLE_TOP): if the `Activity` to be launched is at the top of the back stack, route the `Intent` to that existing `Activity` instance. Otherwise create a new `Activity` instance. This is the same behavior as the `singleTop` launch mode.
* [`FLAG_ACTIVITY_CLEAR_TOP`](https://developer.android.com/reference/android/content/Intent.html#FLAG_ACTIVITY_CLEAR_TOP): If an instance of the `Activity` to be launched already exists in the back stack, destroy any other `Activity` on top of it and route the `Intent` to that existing instance. When used in conjunction with `FLAG_ACTIVITY_NEW_TASK`, this flag locates any existing instances of the `Activity` in any task and brings it to the foreground.
See the [`Intent`](https://developer.android.com/reference/android/content/Intent.html) class for more information about other available `Intent` flags.
#### Handle a new Intent
When the Android system routes an `Intent` to an existing `Activity` instance, the system calls the `onNewIntent()` callback method (usually just before the `onResume()` method). The `onNewIntent()` method includes an argument for the new `Intent` that was routed to the `Activity`. Override the `onNewIntent()` method in your class to handle the information from that new `Intent`.
Note that the `getIntent()` method—to get access to the `Intent` that launched the `Activity`—*always* retains the original `Intent` that launched the `Activity` instance. Call `setIntent()` in the `onNewIntent()` method:
```
@Override
public void onNewIntent(Intent intent) {
super.onNewIntent(intent);
// Use the new intent, not the original one
setIntent(intent);
}
```
Any call to `getIntent()` after this returns the new `Intent`.
### Task affinities
Task affinities indicate which task an `Activity` prefers to belong to when that `Activity` instance is launched. By default each `Activity` belongs to the app that launched it. An `Activity` from outside an app launched with an implicit `Intent` belongs to the app that sent the implicit `Intent`.
To define a task affinity, add the `android:taskAffinity` attribute to the `` element in the `AndroidManifest.xml` file. The default task affinity is the package name for the app (declared in ``). The new task name should be unique and different from the package name. This example uses `"com.example.android.myapp.newtask"` for the affinity name.
```
```
Task affinities are often used with the `singleTask` launch mode or the [`FLAG_ACTIVITY_NEW_TASK`](https://developer.android.com/reference/android/content/Intent.html#FLAG_ACTIVITY_NEW_TASK) `Intent` flag to place a new `Activity` in its own named task. If the new task already exists, the `Intent` is routed to that task and that affinity.
Another use of task affinities is reparenting, which enables a task to move from the `Activity` in which it was launched to the `Activity` it has an affinity for. To enable task reparenting, add a task affinity attribute to the `` element and set `android:allowTaskReparenting` to true.
```
```